Smocking a Bishop Dress For Girls: A Comprehensive Tutorial
Welcome to our comprehensive tutorial on smocking a bishop dress for girls. In this guide, we’ll dive into the intricate art of smocking, providing step-by-step instructions to help you create stunning designs on your bishop dresses.
I myself was once like you, also in the phase of learning about smocking and wanted to make a dress for my niece. And after many years of working in the embroidery industry with top embroidery suppliers in the US, UK, Nigeria, and China, I can confidently show you every detailed step to make a beautiful dress for your daughter.
And this guide is going to be very long – so let’s get ready!
What Does A Smocking Bishop Dress Look Like?
Here is an example of a bishop dress and this product’s name is Smocked Floral Bishop Dress Summertime – SG147

Product’s feature:
- The dress is made of soft and breathable cotton fabric, suitable for the sensitive skin of children. The loose-fitting style creates a comfortable feeling when moving.
- The dress is decorated with a pastel pink floral pattern, giving the baby a sweet and feminine look.
- Moreover, the waist of the dress is smocked in a simple smock pattern, creating a unique highlight for the outfit.
- The dress can be combined with many different accessories such as hats, sandals, and hairpins to create many different fashion styles for the baby.
Materials Needed
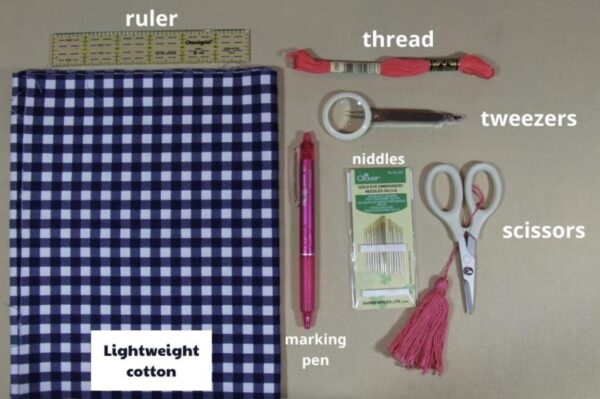
Now, we move to the first main questions: What materials do we need?
- 2 yards of lightweight cotton (I used a gingham with a 1/4″-inch check from Annabel Wrigley’s debut line Maribel with Windham Fabrics)
- 1 skein of embroidery floss (I used DMC 893)
- Cotton thread
- An embroidery needle (I prefer Clover Gold Eye Embroidery needles)
- A ruler and marking pen if you are not using gingham fabric (The Frixion pens are my choice)
- Tweezers (It may be helpful too)
Smoking A Bishop Dress: Tutorial
Cutting
- To start, fold the fabric vertically in half.
- Then, cut two pieces of fabric measuring 72 inches by 10 inches (72″ x 10″) each.
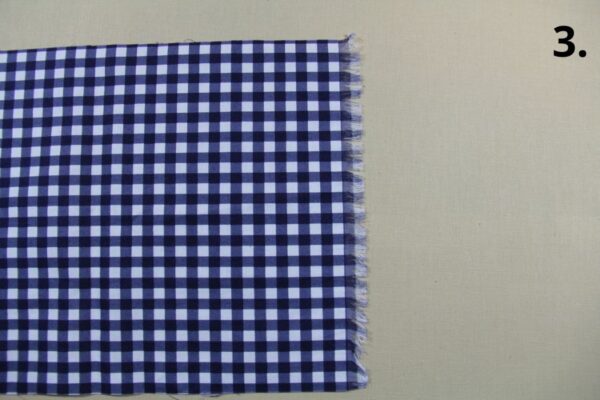
- Now, focus on the first piece and start fraying the ends to create a fringe.
Creating Fringe
- Start by ensuring the ends are cut evenly.
- Then, grab the first weft thread (the threads running side to side) in the weave. Using tweezers can assist in pulling the thread.
- Aim to pull one thread at a time to prevent bunching. As you pull, the fabric will gather.
- Continue until the thread snaps or can’t be pulled further.
- Trim it, tease the other side to loosen a thread, and repeat. Keep going until the fringe measures 1/2 inch.
- Flip the fabric and repeat the process.


How to Hand Sew a Diamond Smocking Stitch
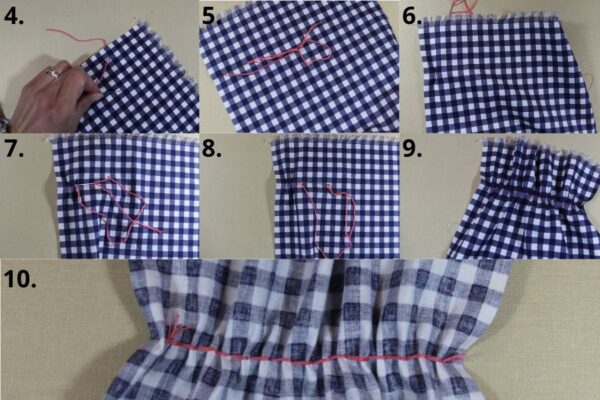
We will be using a modified Diamond Smocking Stitch, creating a honeycomb pattern over multiple rows.
- To begin, cut a length of floss around 18 inches long, thread the needle, and knot one end. If you’re working with gingham, start by bringing the needle through the back of the fabric 8 squares down and 2 squares from the edge. (For other fabrics, begin 2 inches down and 1/2 inch in, marking every 1/2 inch across the row).
- Pull through the front, stopping at the knot.
- Move the needle over one square to the right (or 1/4 inch), picking up two small stitches 1/4 inch apart.
- Pull the needle and thread all the way through to form the first pleat.
- Then, push the needle from front to back through the right side of the stitch, completing one stitch. Easy, right?
- Now, skip the next square (or 1/4 inch) and bring the needle through the back of the top left corner of the following square.
- Continue this stitch across the width of the scarf.
Second Row and Every Even Remaining Row
For the second row and each subsequent even row:
- Skip two full squares or 1/2 inch, then start at the top left corner of the third full square down and the third square (3/4 inch) in from the initial row of stitches.
- Repeat the stitch pattern. (If you’re not using gingham, mark your fabric every 1/2 inch across the row).
- Finish this row with one less stitch than the row above.
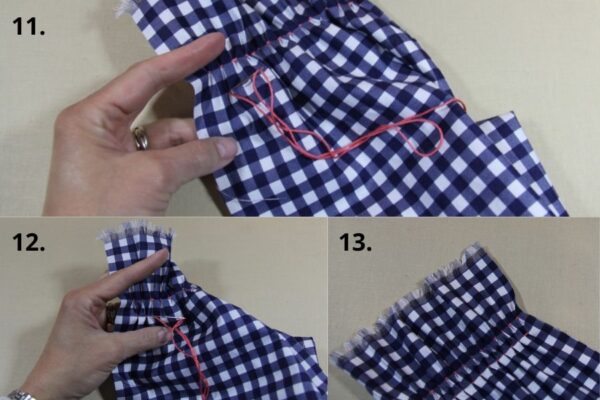
Third Row and Every Odd Remaining Row
For the third row and every subsequent odd row:
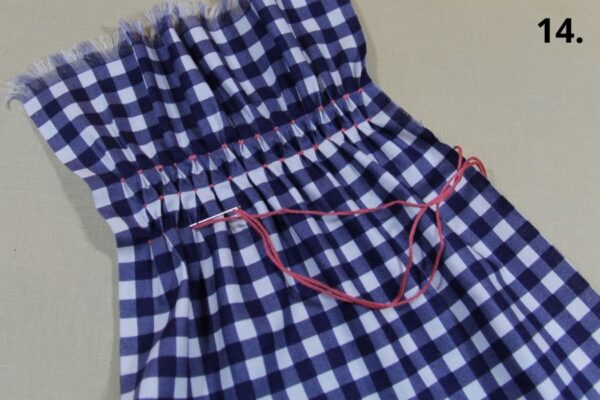
- Insert the needle from behind, 2 squares under the previous row and 2 squares from the edge, ensuring alignment with the first row. (If using a different fabric, mark at 1/2 inch intervals.) Isn’t this pattern lovely?
- Keep stitching until you’ve finished 10 rows.
- Then, repeat this process at the opposite end of the scarf, and again on both sides of the other piece of the scarf.
Sewing the Side Seams
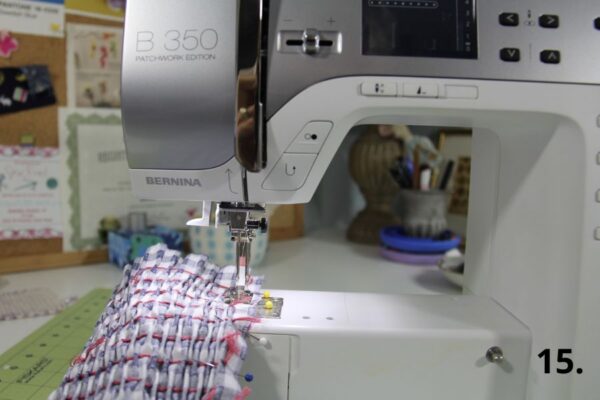
- Align both scarf lengths with their right sides facing each other.
- Pin along the long sides and sew straight down each side with a 1/2-inch seam allowance, leaving the fringed edges open. (We won’t sew those.)
Finishing
- Press the scarf thoroughly, focusing on smoothing out the side seams.
- Insert your hand through one fringed end, grab the opposite side, and pull it right-side out. Ta-da! Finished!
Where to Buy An Adorable Smocked Bishop Dress?
If you find it too hard for you, that’s okay, we can try again. But we still have another option for you. Simply go to the K-Embroidery’s collections and find which ones you like the best.
Our products are 100% hand-smocked, designed and created by the most skillful hands of artisans in Vietnam. There are also reviews and feedback from customers who have purchased from us and you can refer to them and make your choice.
Conclusion
As we reach the end of our tutorial on smocking a bishop dress for girls, you must have done smocking a bishop dress and I can’t be more happy and proud of you.
Crafting these dresses has been more than just a project—it’s been a journey of creativity and love. With every stitch, I’ve poured my heart into creating something special for the little ones in my life.
So, to all the women out there who share my passion for sewing and crafting, I hope this tutorial has inspired you to create something beautiful for the little girls in your life. Let’s continue to spread joy and love through our handmade creations. Happy sewing!


